
Editing an Old Mission Briefing
by Ed Benowitz and Phillip Ogden
These old style mission briefings only
require a .xml file. They are simpler than newer mission
briefings, which require a lua script, but are not as powerful or
flexible.
Basic Concepts
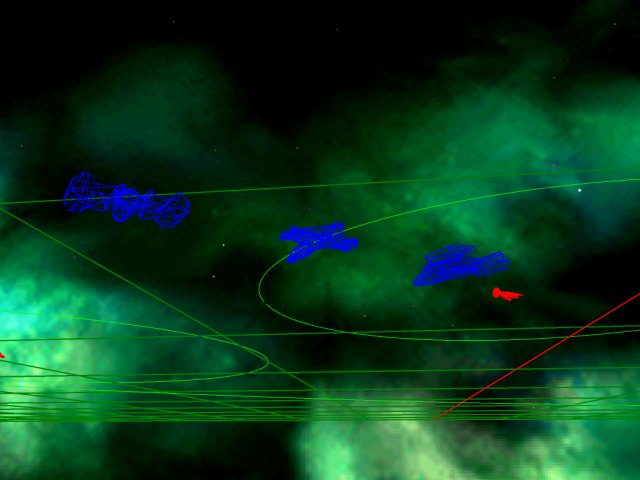
A mission briefing appears before a given mission. It is used for
storytelling, to get the player prepared for the mission. In
every mission briefing, the camera movement is already predetermined.
All you have to do is provide locations for nav points, ships,
and some accompanying story text, and the mission briefing takes care
of the rest.
Mission Briefing File
The mission briefing file must be named correctly. The briefing
filename is the same as the mission filename, except that the briefing
file name ends in .briefing.xml.
For example, if the mission is named mission_a1.mission.xml, then the briefing must be named mission_a1.briefing.xml.
Player
First, it is easist just to copy over an already created briefing file,
but here is a basic form for it that will make things a little easier
to change out.
Okay, first you have the initial lines.
<?xml version="1.0" encoding="UTF-8"?>
<briefing playership="piranha.mesh.bin" xmlns:xsi="http://www.w3.org/2001/XMLSchema-instance" xsi:noNamespaceSchemaLocation="briefing.xsd">
All you want to do here is to
add the name of the ship you are going to fly in the mission. Change the value of playership. This ship
will be at the (0,0,0) of every navpoint in the briefing. Say we what
to fly a piranha, well what is the name of its primary mesh.bin.
(piranha.mesh.bin) Not all mesh files are named so easily in relation
to the ship's name, though.
Navpoints
Now that we have a player, we add nav points. A briefing can have
any number of Nav Points. Nav points appear as green circles.
The navpoints element acts as a container for each individual nav point.
<navpoints>
  <navpoint radius="200.0">
     <location>
        <point x="400.0" y="2.66" z="500.0"/>
     </location>
  </navpoint>
</navpoints>
Now the first thing in a nav is it's radius or size. It is best to have
capship navs with a radius of 200 and a radius of 100 for empty or
fighter navs. Next, choose a location for the nav point.
The center of the map is at 0, 0, 0. Keep in mind the
radius of this and other nav points as you choose your location, you
don't want nav points to overlap.
Optionally, you can also specify a nav point name that will be displayed in the briefing.
<navpoint radius="200.0" name="Nav 2">
Briefing Text
Now for the storytelling. During the briefing a ship does 2 things.
- Rotates to face the center of the next nav. As we edit the brieifng, this is called the "atmessage".
- Move to the next nav. As we edit the briefing, this is called the "leavingmessage".
This process repeats for every nav point.
You can have different text displayed during each of these phases for
every Nav point. The folllowing shows adding text for both the
atmessage and for the leavingmessage:
<atmessage>
This is your first mission, so you'll be flying a Piranha.
</atmessage>
<leavingmessage>
Leave the Midway, and proceed to nav 2.
</leavingmessage>
Currently the game does speech synthesis for every line of text in the
briefing. Each nav point can have one at message and one briefing
message.
Ships
Ships can either travel with the player through the navs, or they can
stay at a fixed position at a nav. When the ship moves with the
player, we call this autopiloting.
If the ship is autopiloting, when we specify the location, the location
is always relative to the player's position. y is up, x is to the
right, and z is forward. For example, to place a wingman to the
right of a player, we would specify (20, 0, 0).
However if a ship is not autopiloting, the location takes on a
completely different meaning. In this case, the location is
relative to the center of the nav point. y is up, x
is to the right, and z is forward.
It will
take a little trial and error, though, to get the location right.
The player only has the
mesh already defined at the top for the xml file, but for your wingmen, they will have
to be defined in the nav they start in. Here is your wingman:
<ship name="piranha.mesh.bin" autopilot="true" alignment="friendly" capship="false">
<location>
<point x="20.0" y="0.0" z="0.0"/>
</location>
</ship>
let's look at each field
name: nave is the name of the mesh file of the ship. These files must end in .mesh.bin or .obj
autopilot: When
autopilot is true, this ship will go through all nav points with the
player. Otherwise, the ship stays at a fixed location within the
nav point.
alignment: Used to control the color of the ship. Can be either friendly or enemy.
capship: Used to control the color of a ship. Set to false for fighters.
location: specifies the location of the ship, either relative to the
player, or relative to the nav center, depending on the value of
autopilot.
Capships
For capships, you may have to add in a scale to decrease the size of the mesh in the briefing. Here is the Midway:
<ship name="midway.mesh.bin" autopilot="false" alignment="friendly" capship="true" scale=".05">
<location>
<point x="60.0" y="0.0" z="0.0"/>
</location>
</ship>
Conclusion
With this information, copy over mission_a1.briefing.xml, and use
it as a template for creating your own mission briefings.