
Editing the GameFlow and
Movies
by Ed Benowitz
since 1.5
Basic Concepts
We'll now discuss all parts of the game between missions.
This
includes the game menus(the gameflow), and the movies played between
mission. The gameflow is fully customizable. The
gameflow
consists of several rooms.
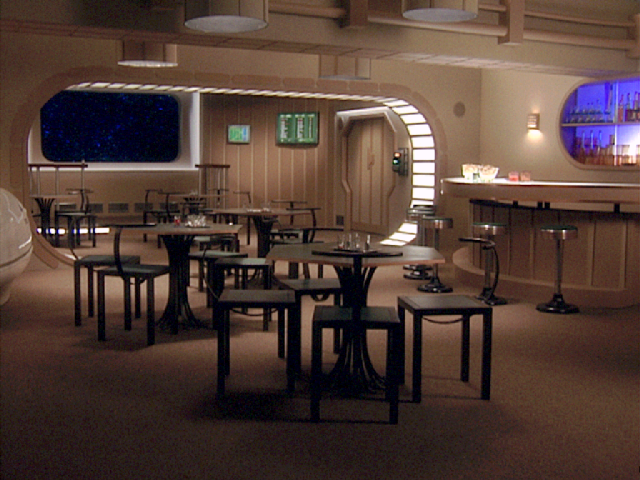
Above, we see one particular room in the gameflow. You can
customize the appearance of every room, and add as many rooms as you
want.
Each room has a number of places that a player can click. We
call
these "hotspots". When the mouse hovers over a hotspot, some
text
will be displayed. Hotspots can be used to perform many
actions:
- Move the player to another room
- Play a conversation movie
- Display a menu
- Start the mission
Additionally, some hotspots can display an animation.
An
animation is a series of images, displayed on top of the background.
The doors that open as you move the mouse over them are an
animation.
Additionally, music and sound play in the background.
Editing gameflow.xml
The first place to start is gameflow.xml. Open up this file
in an xml or text editor and follow along. First, I'll post
a simplified version of gameflow.xml that covers the structure
<?xml version="1.0" encoding="UTF-8"?>
<gameflow xmlns:xsi="http://www.w3.org/2001/XMLSchema-instance" xsi:noNamespaceSchemaLocation="gameflow.xsd">
    <!-- Empty ready room -->
    <room background="readyroom.png">
        <hotspot mouseovertext="Rec room" sound="door.wav">
            <rect x="24" y="103" width="108" height="281"/>
            <command id="changeroom" param="1"/>
            <animation filebase="rd_door1_" numframes="13" fps="8" x="30" y="79"/>
        </hotspot>
    </room>
    <paneltext>
        <color r="0.18" g=".71" b="0.69" />
    </paneltext>
    <music debriefing_good_music="wc1-debriefgood.mp3" debriefing_bad_music="wc1-debriefbad.mp3" background_sound="gameflow_chatter.mp3" default_music="fcgameflow.mp3" />
</gameflow>
The gameflow consists of many rooms, followed by paneltext, followed by
music. Each room can contain many hotspots. We'll
cover the rooms later, but first, let's hit a few easy topics first.
Paneltext
The paneltext
 <paneltext>
        <color r="0.18" g=".71" b="0.69" />
 </paneltext>
controls the color of menu text. Each of r, g, and b are on a
scale from 0 to 1.0, and represent red, green and blue. Most
paint programs are on a scale from 0 to 255, so just divide the paint
program's number by 255 in a calculator.
Music
<music debriefing_good_music="wc1-debriefgood.mp3" debriefing_bad_music="wc1-debriefbad.mp3" background_sound="gameflow_chatter.mp3" default_music="fcgameflow.mp3" />
In the main gameflow, there are actually 2 music files playing
simultaneously.
- The music file. The is controlled by the
attribute named default_music.
- Some background chatter, representing some voices coming in
over an imaginary intercom. This is controlled by the
attribute background_sound.
Additionally, a different music file plays during a debriefing, and
this is also controlled in the gameflow.xml file. For a
winning mission, the sound specified by debriefing_good_music will be
played. On a losing mission, debriefing_bad_music will play.
Rooms
Remember, you can add as many rooms as you like. A room
itself consists of many hotspots, and a background image.
<room background="readyroom.png">
The background image should originally be sized 640x480. Keep
a backup of the original image, we'll need it later. Keeping
the original image in the lower left hand corner, you'll need to put
empty space around the right and top of the image, so that it's new
size is 1024x512. This is because OpenGl requires images to
be sized to a power of 2. Do not stretch the original image
as you do this resize.
Hotspots
We'll first start off with a simple hotspot
        <hotspot mouseovertext="Ship viewer">
            <rect x="221" y="120" width="37" height="31"  />
            <command id="shipviewer"/>
        </hotspot>
mouseovertext: This optional attribute specifies the text
that will be displayed when the player moves his/her mouse over the
hotspot.
rect:
The area containing the hotspot. To determine this open up
the original 640x480 background image in an image editing program.
The rect specifies the upper left corner of the hotspot.
In this case, the upper left corner of the screen is 0,0.
command: The id attribute identifies what happens when the area
within the hotspot is clicked. It can be one of the following
values:
- changeroom
- Here is an example of a changeroom command. You'll notice
the additional param attribute. If the command is a changeroom,
the parameter specifies the room that the player moves into. The
first room in the gameflow.xml file is room 0.
<command id="changeroom"
param="1"/>
- startmission
- load
- save
- settings
- Displays the settings menu
- email
- Displays the messages menu
- campaign
- Displays the campaign menu
- shipviewer
- simulator
- exit
- killboard
- playmovie
- Plays a movie. We'll discuss this later.
Now we'll move on to a more complicated hotspot
        <hotspot mouseovertext="Ready room" sound="door.wav">
            <rect x="336" y="112" width="81" height="123" />
            <command id="changeroom" param="0" />
            <animation filebase="bardoor" numframes="12" fps="8" x="350" y="243"/>
        </hotspot>
This hotspot is a door. When the player moves the mouse over the
hotspot, the sound "door.wav" is played, because of the sound
attribute.
Additionally, note the animation parameter. This is used to
display an animation. An animation is a sequence of images.
filebase: The base file name. If the basename is bardoor, and
there are 4 images in the animation, the following files will be
displayed in order:
- bardoor0.png
- bardoor1.png
- bardoor2.png
- pardoor3.png
numframes: The number of images in the animation
fps: The speed at which the images change. This is short for Frames Per Second. 8 is a reasonable number.
x and y: Refer to where to place the lower left hand corner of the
animation. It may take some trial and error to get the position
correct.
Note that all animation images, must be .png files with alpha channels.
They must be a power of 2 in width and height, but you can
use the alpha channel to exclude any extra parts around the top and
right.
Optionally, you can also use the loop attribute to force the animation
to cycle. Otherwise, it will go forwards when the mouse is over,
and backwards when the mouse is moved outside of the hotspot.
<animation filebase="rd_mt" numframes="10" fps="6" x="556" y="127" loop="true"/>
Customizing Movies
You can now play movies, and even choose which movies to play for each mission.
The following diagram shows the various phases of the game.
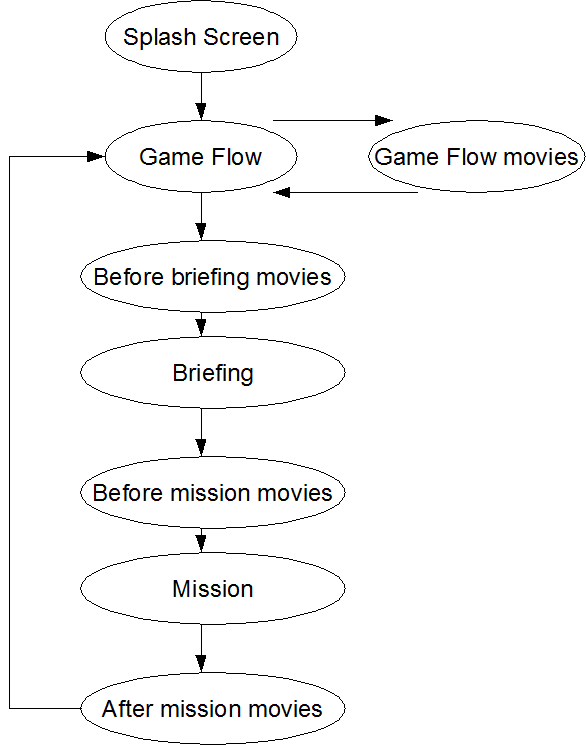
From the diagram, we can see four places to play movies:
- Before the briefing
- Before the mission
- After the mission
- During the gameflow. This would be used for conversations with characters, before the player chooses to start a mission.
Now, most customization will involve lua scripting. All Flight Commander
scripts are done in the Lua
scripting language. The book Programming
in Lua is a good introduction. Note that when editing outside of a mission, only certain functions are available.
To customize the movies for a particular mission, you need to create a
file mission_name.gameflow.lua. For example, if your mission is
named A1.mission.xml, your new gameflow script file must be named
A1.gameflow.lua.
The gameflow.lua script
You'll always want these to be the first 2 lines of your script:
dofile "flightcommander_gameflow.lua"
dofile "default.gameflow.lua"
Then, you must define at least the following four functions, even if they are empty.
function startup()
end
function beforeBriefing()
end
function beforeMission()
end
function afterMission()
end
Startup is called whenever you start a new mission. Within startup, you can call any of the following
In the next series of functions, you're allowed to play movies. You can choose which movies to play based on saved variables for example, which are available for your use.
beforeBriefing and beforeMission behave similarly. You can add as
many movies as you want to these functions by calling
Gameflow_addMovie
You can also add movies to AfterMission. In addition, to saved
variables, aftermission has access to serveral variables from the
mission that just completed.
You could use these variables, for example, to choose which movie to play. These variables are
- debriefing.mission_status
- debriefing.player_damage
and are documented in the gameflow scripting reference.
The default.gameflow.lua script
Note that if you do not provide a mission.gameflow.lua file, the game
runs default.gameflow.lua instead. This serves to run the default
movies if you have not specified special movies for a particular
mission. The functions within default.gameflow.lua are similar
to the ones mentioned before, except they begin with Default.
- Default_startup
- Default_beforeBriefing
- Default_beforeMission
- Default_afterMission
You are free to edit any of these default functions yourself. You are
also able to call any of these functions from within your own
mission.gameflow.lua file, if you'd like to use the defaults in certain
cases only.
Playing Gameflow Movies
Besides playing movies before briefings and before and after missions,
we can show players some movies in the middle of the gameflow. These
movies are played when the player clicks on a hotspot.
For example in this hotspot
        <hotspot mouseovertext="Talk to Stiletto">
            <rect x="415" y="139" width="57" height="73"/>
            <command id="playmovie" param="stilettomoviefunction"/>
            <animation filebase="stiletto_rec" numframes="1" fps="6" x="426" y="279" loop="true"/>
        </hotspot>
note that the command is playmovie. When you specify
playmovie, param is the name of the script function that will be
called. Make sure to place this script function in your
mission.gameflow.lua file. For example, in this case we add
  function stilettomoviefunction()
    Gameflow_addMovie("stiletto_talk.avi", "stiletto_talk.mp3");
  end
to play Stiletto's movie at the right time.
Gameflow Scripting Reference
Gameflow_addMovie(string moviefilename, string mp3filename)
Where moviefilename is an avi file and mp3filename is the name of an mp3 file.
Adds a fullscreen movie. Can be called in any gameflow script function except startup.
Example:
Gameflow_addMovie("scramble.avi", "scramble.mp3");
Since 1.5
Gameflow_setStartingRoom(int room)
Where room is a room within gameflow.xml.
This is used to start off a particular mission in a different room.
This is useful for changing the room background to add an
additional hotspot for a character conversation. The first room
in gameflow.xml is 0. This function can only be used within
startup function.
Example:
Gameflow_setStartingRoom(2);
Since 1.5
Gameflow_setBackgroundSound(string mp3filename);
Where mp3filename is the name of an mp3 sound file.
During the gameflow, a background voice is played. The sound can
be changed by calling this function. This can only be called in
the startup function. This is useful if, for example, you'd like
to play a scramble voice in the background for certain missions.
Example:
Gameflow_setBackgroundSound("gameflow_scramble.mp3");
Since 1.5
Gameflow_setNextMission(string mission_name);
Sets the next mission. This can only be called within an an
afterMission function. This does not normally need to be called,
as the next mission
is normally chosen from the campaign.xml file. However, if you
want to override the campaign.xml file, this is the way to do it.
Example:
Gameflow_setNextMission("mission_a9.mission.xml");
Since 1.5
int debriefing.mission_status
This variable is only valid within an afterMission function.
The variable can have one of the following predefinted values.
- MISSION_LOST
- MISSION_WON
- MISSION_DEAD
- MISSION_EJECT
Example:
  if debriefing.mission_status == MISSION_WON then
     -- do something here
  end
Since 1.5
float debriefing.player_damage
This variable is only valid within an afterMission function. This
variable shows how damaged the player's ship got during the mission.
1.0 means the ship is practically destroyed, 0.0 means the ship
has no damage.
Example:
    if debriefing.player_damage > .6 then
      -- lots of damage
    end
Since 1.5